Adding Wind effects
Introduction
The color of a vertex in a model allows the artist to specify how a plant model will behave once it is brought into Torque 3D. This also covers how a plant will respond to a wind emitter. Here is a breakdown of how the colors affect a model:
- Bending of branches: controlled by the amount of red on a vertex. Normally the ends of branches are fully red, and the spot where they reach the trunk would be fully black (or colorless, depending on how you are painting…see my method below), with a smooth gradation between.
- Branch group instancing: So that groups of branches sway independently, they need to have varying amounts of green. Usually done by selecting a clump of branches/fronds and filling with a random shade of green (anywhere from pure green to black).
- Flutter of leaves: flutter is controlled by the amount of blue on a vertex. Normally, the ends of fronds are fully blue so they flutter fully, but I’ve found that in a lot of cases (in trees, mostly) I can just fill the entire frond with blue.
- Vertical bend: the vertical bend of a tree does not have to be painted… that is calculated automatically by its height
Vertex Painting Your Model
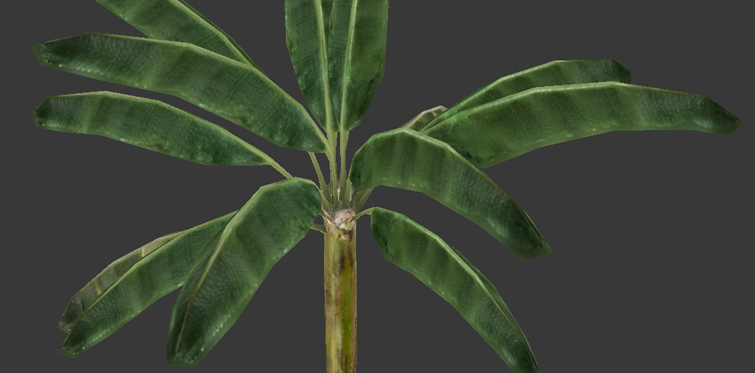
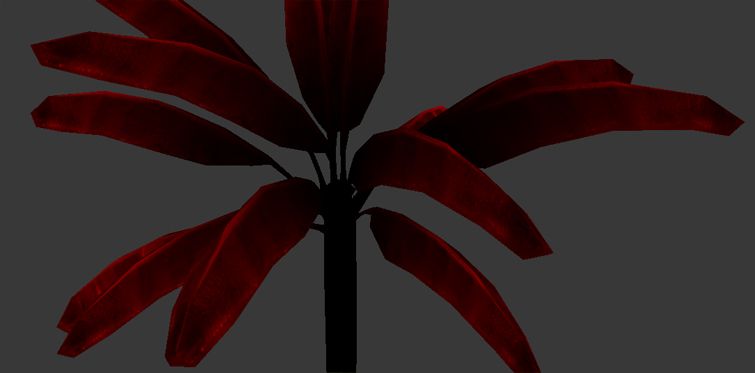
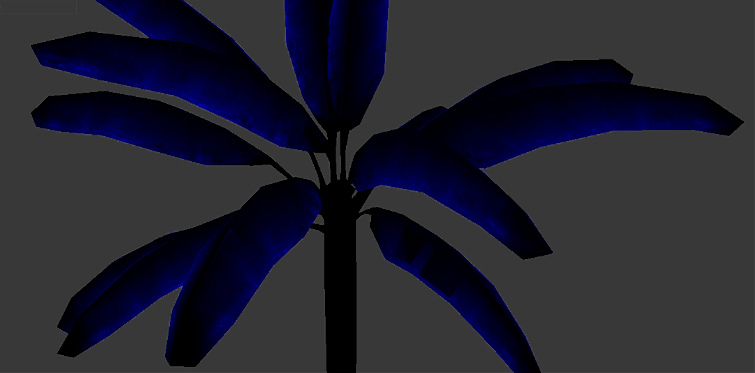
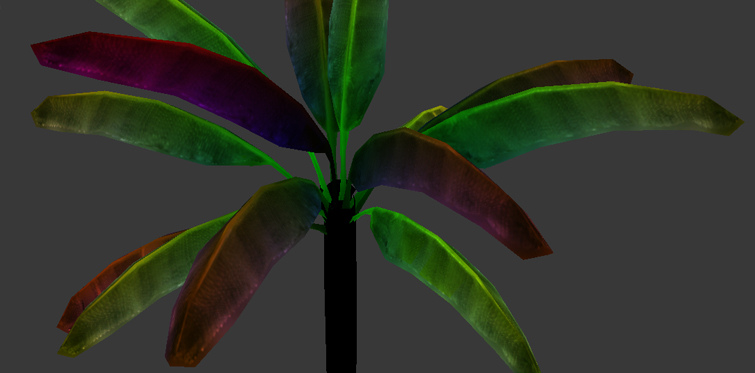
The following images represent the tree model with the separate vertex coloring steps:
The tree without any vertex coloring:
The red coloring only, to designate the upward/downward bend of the branches. Notice how the base of the branches are black and the ends of the branches are red:
The blue coloring only, to designate leaf fluttering. Notice how only the edges of the blades are colored:
The green coloring only, to designate individual instances of branch bend. Each branch has its own shade of green:

Finally, all the colors mixed together with an additive blend. Notice that the trunk has no coloring, since it will neither flutter like a leaf nor wave like a branch. The bend along the tree’s height is done without the use of vertex coloring:
Here is a video of this in action:
https://www.youtube.com/watch?v=q8cjthzGcf0 (video/Forest Editor Wind Effects.mp4)
How you actually apply these color sets varies between modeling apps. The following is an example from 3D Studio Max:
- Stack three separate Vertex Paint modifiers on the tree model.
- Working from the bottom, one modifier at a time, fill the vertices with black, then paint one of the color sets listed above to each of the three modifiers. In the end, it doesn’t matter in what order the colors are created or stacked.
- After all three have been painted their own color set, set the blend mode of the top two Vertex Paint modifiers to “additive”.
- Export your model as COLLADA with these modifiers on and you should have the vertex coloring you need to get wind effects on your meshes. Do not collapse the stack.
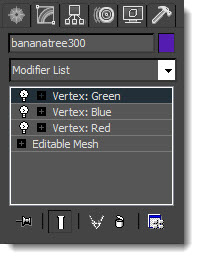
If you need to go back and tweak individual color sets/modifiers in Max, you can put their blending modes back to “normal” and turn them on and off to isolate an individual color set. DO NOT eyeball the colors. Dial them in. Red means pure red, or R:100%, G:0%, B: 0%.
Exporting Your Mesh
The DTS format does not support vertex color data, which means you will need to export your models as COLLADA files. A commonly used plug-in is OpenCOLLADA, which is a free exporter for 3D Studio Max.
Note: At the time this article was written, 3DS Max’s built-in COLLADA(.dae) exporter was not exporting vertex coloring correctly. OpenCOLLADA exports both vertex coloring and User Properties correctly. Just be aware that it appends material names with “-material”.
Setting Up A Mesh In Torque 3D
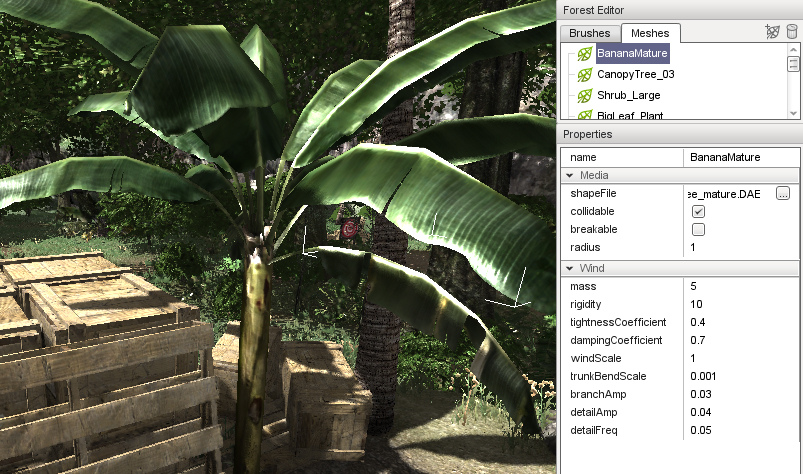
Once a mesh is brought into the Forest Editor (and a global wind emitter is placed in the scene), the mesh parameters must be set properly for your plant to come alive correctly. Definitions for mesh parameters:
- shapeFile - Path to mesh
- collidable - Indicates whether or not the mesh uses collision
- breakable - (not implemented)
- radius - The canopy radius in meters. This keeps plants from being placed too close to one another and having overlapping canopies. This value may need to be adjusted on larger plants when placing smaller plants under their canopy (placing bushes under a tree, for instance). This has no in-game functionality and only matters when placing trees in your environment.
- mass - Mass will generally affect how springy a plant is in response to wind or an explosion. Think of it as a weight on the end of a stick. Most of my trees are set to around 5, smaller plants down to 0.5.
- rigidity - How much the plant resists the wind force. Most of my trees are within 10-20, but some small grasses go down to 1.
- tightnessCoefficient - How much the plant resists bending. Between 0 and 1.
- dampingCoefficient - Slows down the sway of the plant so it won’t whip back and forth forever. Between 0 and 1.
- windScale - Relative scale at which this plant is affected by wind. Between 0 and 1, but will almost always be set around 1.
- trunkBendScale - The amount that a plant will sway from top to bottom. This is very sensitive. I don’t have any vegetation set higher than 0.03, and most are under 0.01.
- branchAmp - Amount that a branch with sway up and down. Start well below 1.
- detailAmp - The amount of leaf flutter. Start well below 1, in the 0.05 range.
- detailFreq - The speed of leaf flutter. Start well below 1, in the 0.05 range.
It may seem like a lot of these appear to be doing the same thing, but there are subtle differences. The numbers shown in the example images are just starting places. Your plants may differ due to the way you’ve colored their vertices or set the global wind emitter.
Setting the View Distance of Wind Effects
Plants in the distance will not display wind effects. This can be changed by simply adjusting the variable assigned to this range: $pref::windEffectRadius = 30. That sets it to 30 meters around the camera. The default setting is 25 meters. Obviously this will affect performance, but you can cater it to your specs. Make sure to save your level after doing this.
Conclusion
This guide covered the basics of how Torque 3D utilizes vertex painted objects. Artists are given a lot of control over forest editing. Vertex painting is an extremely important step and should be considered when developing your forest assets. In addition to the global wind emitter, you can use a local wind emitter around anything that may create a localized wind situation
- waterfalls
- helicopter rotors
- big fans
- jet engine exhaust
- etc